How to Install Chrome OS on any PC or Laptop, a Complete Guide with Step by Step Installation Process for installation for Windows, Android, Linux, iOS and Mac OS…
Chrome OS is an operating system that is focused on the web thus giving a user access to anything that is available on the web. Turning your old computer into a Chromebook can be made possible by simply installing Chrome OS and making it operate like a new computer.
Install Chrome OS on PC
Installing Chrome OS on any Personal Computer is very easy so long as one has the necessary tools in place. Being a Lightweight browser Google Chrome is available for free and can be easily downloaded for Windows, Android, Linux, iOS and Mac OS.
Since Chrome is a closed-source operating system, it is not possible for anyone to run it on any hardware. It is therefore recommended that you consider using the Chrome OS open-source operating system that is commonly known as Chromium OS.
Chromium OS can only be used by installing it yourself since Google does not offer any build-up to this software. There are also other options that one can use in installing the open-source Chromium Software or any other software that is related to it.

If your main aim is downloading and installing Google OS on any Personal Computer, then you are at the right place. Carefully follow this step-by-step guide to download Chrome OS and install it on your Personal Computer without any problems.
How to Install Chrome OS on PC
Before you download and start installing Chrome OS on your PC, you will need to have access to a number of prerequisites. They include:
- Minimum 8 GB pen drive.
- WLAN card or adapter.
- Minimum 2 GB RAM.
- Spare SSD/HDD.
- Win32 Disk manager.
- 7-Zip.
Download the Prerequisites
Download Image Writer
- From your browser, access the Image Writer download page.
- Click on ‘external download’.
- Once selected, the download will begin automatically.
Download 7-zip
- Open the 7-zip download page using your browser.
- Select ‘exe’ download depending on the type of system architecture that you have.
- The download process will be initiated.
Download Chromium OS Special Image
Chromium OS Special Image can be easily downloaded by following the steps below:
- On your browser enter chromium.arnoldthebat.co.uk as the link for downloading Chromium OS Special Image.
- Select ‘special directory’ by clicking on it.
- Click twice on the ‘last modified’ column.
- Depending on the configuration settings of your system, select either the 64-bit version or the 32-bit version.
- Start the download process by clicking on the file link.
Extract the Chrome OS Image File
After successfully installing the 7-zip and win32diskimager, you should then extract the Chrome OS Image File. This is made possible by following the steps given below:
- Access the location that contains the downloaded Chromium OS image file.
- Right-click on the Chromium OS image file and then select 7-zip.
- To extract the image file, click on ‘Extract here’.
Once you have successfully extracted it, you will get a file that has a size of 7.15 GB that is automatically named as chromiumos-image.img. Burn the extracted Chrome OS image file into your USB using Win32Disk imager.

Create Chromium OS Pen Drive
The third step involves creating a Chromium OS Pen Drive. This is done using the steps shown below:
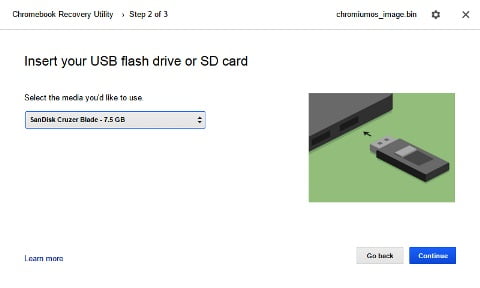
- Insert a pen drive (minimum 8 GB) into your system.
- Back up any data that is available on the pen drive.
- Open the win32Disk imager.
- On the opened page, select the image file and click on the ‘Folder’ icon displayed. Once this is done, select the location of the extracted Chrome OS image file.
- From the drop-down menu, select the drive letter of your pen drive.
- Finally, click on ‘write’ to complete the creation of the Chromium OS pen drive.
Booting
Booting on your personal computer should be done using the USB pen drive This is done by inserting the USB pen drive into the system in that you want to install Chromium OS. From this point, you can change the settings of the BIOS to make it possible for the system to boot using a pen drive.
Test Running the Live Chromium using a pen drive
When the system is booting, the screen should display the Chromium OS logo. If nothing or a black screen is displayed, then it means that it means that it is not compatible with either your graphic card or Chromium OS drivers. Report this issue by accessing the GitHub project page on your browser.
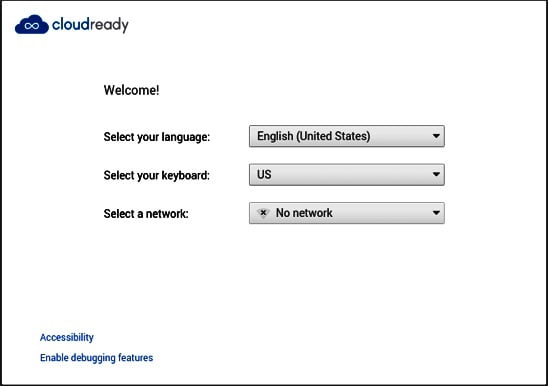
Once booting is completed, the screen will display a welcome signifying a successful boot. You are then required to configure the Wi-Fi connection by performing a systematic wizard.
After doing this, you should then synchronize your Google account. Finalize by confirming whether everything is working as required and if Chromium OS has identified all the hardware contained in your personal computer.
Install Chromium OS to your Hard Drive/ Hard Disk
Once you are satisfied with the results of the tests, installing the Chromium OS permanently on your personal computer can follow. Follow the steps below to install Chromium OS to your hard drive:
- On the Chrome Login screen of your account, press Ctrl+Alt+F2 once The Chromium OS has completed loading. This action will bring up the console window.
- In the Developer Console login section, use Chronons as the username and press “Enter”.
- In the option that follows, type Isblk and then press enter again.
- This action will list down all the disk drives that are connected to your system. The size of each disk drive will also be displayed.
- Identify the disk code of your hard disk, as it may be either sda or sdb depending on the configuration settings of your system.
- After successfully discovering your disk code, type in the following command/usr/sbin/chromeos-install –dst /dev/[harddisk code]
- Hit the ‘Enter’ button and wait as installation takes place. Installation time depends on the configuration of your system and may take 15 to 20 minutes or even 1 hour on other personal computers.